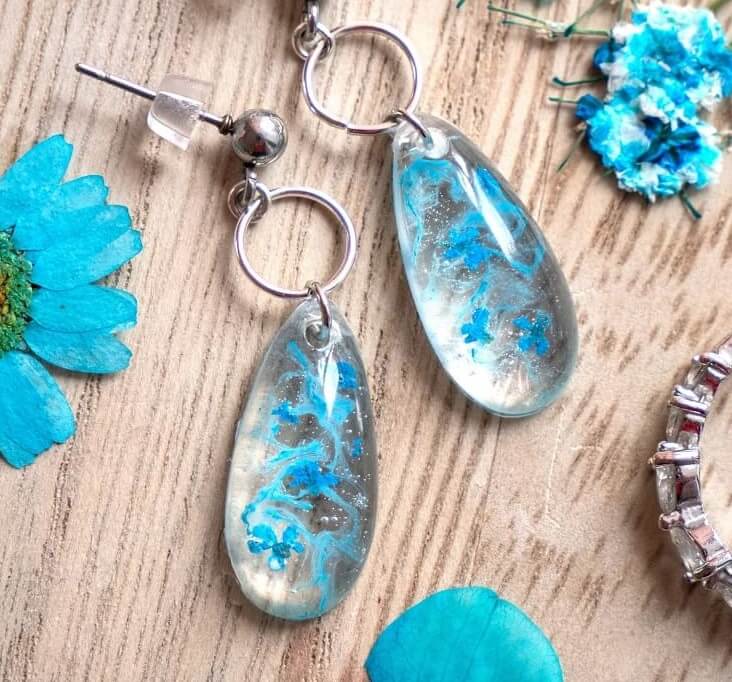
How to make epoxy resin jewelry
How to make jewelry from epoxy resin?
When addressing this question, it is important to first mention that there are several types of resin. Since each type offers different properties, it is essential to choose the right one.

##MEDAILONEK_EN_001##
Crystal resin, epoxy resin, or UV resin?
In jewelry making, crystal resin is very popular as it mimics glass. Crystal and epoxy resins are essentially the same product under different names. A significant advantage is that you can choose a resin that is UV stable and provides a beautiful finish once cured. Additionally, you can opt for thinner resins, which allow better bubble release (great for clear jewelry) or thicker ones, which offer the possibility of impressive color blending. Curing time depends on the chosen resin, ranging from 12 to 48 hours.
UV resin allows you to have a finished product ready to wear in just a few minutes. You simply prepare, decorate, cure with a UV lamp, and the product is ready. However, a downside is that UV resins are not UV stable and may yellow over time depending on how often they are exposed to sunlight. If you tint this resin, the yellowing will be less noticeable.

Are both resins suitable for silicone molds?
The answer is yes. Resin jewelry is most commonly made in silicone molds. Due to their smooth surface, you often almost completely eliminate the need for sanding and additional finishing. Silicone molds also often come with pre-made holes for placing jewelry components, so you won’t need to drill the resin pieces.
How to choose crystal resin?
We choose crystal (epoxy) resin based on the product we intend to make. The same applies to jewelry. So, which resin from our range should you choose for jewelry?
This resin is UV stable and is therefore suitable for uncolored jewelry. It is also suitable for fully colored casts.
Fluid is among the thicker resins and allows you to create beautiful color blending and effects that would be difficult to achieve with a thinner resin.
This resin is very user-friendly as it offers a long working time and cures relatively quickly (24 hours). We like to use it for more complex arrangements where we need more time. It has a beautiful and glossy finish after curing.
With thicker resins like Fluid, you should expect that it is less effective at releasing trapped bubbles. However, this is something you can manage with our guide “How to handle bubbles in resin”.
This resin is almost exclusively recommended for jewelry making. It is one of the thinner resins and cures longer (about 48 hours), which results in a bubble-free product. Of course, you must mix it slowly and patiently to avoid incorporating bubbles.
It is UV stable and has a beautiful surface after curing.
The newest member of our resin family combines fast curing (12-24 hours), long working time, UV stability, and a thinner consistency that handles bubbles better. It offers the best of both worlds in resin. The surface remains beautiful after curing, although it might not appear as perfectly glossy as Fluid or Glass resin to a trained eye.
With this resin, you can create many beautiful products at an affordable price. It is perfect for beginners. It is not UV stable and is therefore more suitable for colored products. It offers a shorter working time but cures faster (within 24 hours).
What else do I need for making?
You can choose one of our starter kits for jewelry making or select the tools yourself.
In addition to crystal resin and protective equipment, you will also need:
- mixing cups and spatulas;
- silicone jewelry molds;
- jewelry components;
- digital scale;
- decorations and colors.
It is also advisable to protect the work surface from possible mess. You can use ordinary baking paper, or a silicone mat or plastic sheeting.
How to start making?
1) Mix the resin according to the ratio specified on its packaging.
Need advice on mixing resin? Check out this article.
2) Tint the resin
Choose resin colors based on their final effect and degree of tinting.
- Transparent liquid colors, which have less pigment, so they will color the resin but it will remain transparent.
- Opaque liquid colors, which will give you rich and opaque shades.
- Metallic powders, which usually color the resin opaque. However, this depends on the amount used. As a bonus, this colorant adds a nice metallic shimmer.
2) Add decorations
It is also possible to mix in glitter. However, keep in mind that glitter is heavier and tends to settle at the bottom of the piece.
If you add dried flowers to the jewelry, remember that they tend to float. During curing, check and gently press them back into the resin.
Remove bubbles and cover the items
After pouring the resin and arranging it, the only thing left is to remove bubbles from the surface. For this purpose, you can use a quick pass with a lighter. Never hold the flame above the resin, just quickly pass over it to avoid the resin sticking to the mold.
An alternative to a lighter is an alcohol spray, which you can spray once or twice from about 20 cm away to pop the bubbles.
Finished resin jewelry should be stored under a cover that creates an ideal warm environment for proper curing and prevents dust from settling.
VIDEO: Resin Jewelry
##PRODUCT-WIDGETS-33676##
